


DIY TIG Welding Machine To Cold Welding Machine Stainless Steel Mini Spot Welder Time Pulse Controller Modified Cold Welder
14:10#Set B
Regular price $225.45 Sale price $135.99 Save $89.46SPECIFICATIONS
Brand Name: NoEnName_Null
Hign-concerned Chemical: None
Model Number: YU
Origin: Mainland China
Type: Power Tool Parts
Use: Commercial Manufacture
is_customized: No
Description:
This is a modified controller, not a welding machine, can not be used alone, to be connected with argon arc welding machine to use. If your requirements are: arbitrary welding without discoloration, free polishing, arbitrary welding no deformation at all, no temperature after welding, no argon gas. Please purchase carefully if you have the above requirements. Our product is not suitable, thank you. There is no such machine on the market at present.
Specification:
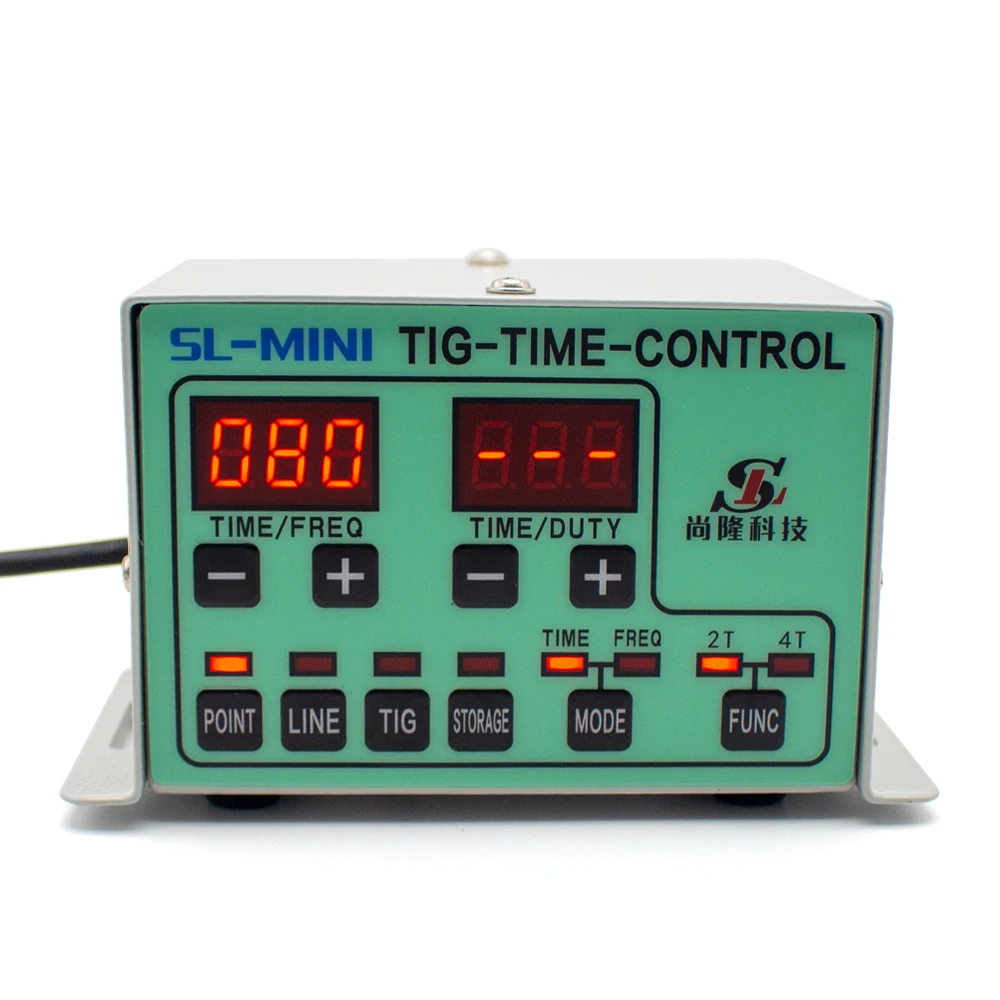
Product Name: argon arc welding precision pulse controller
Product Model: SL-MINI
Applicable Models: Single-Use/Dual-Use/Three-Use Argon Arc Welding Machine
Working Mode: Single Point/Continuous/Argon Arc Welding/2T/4T
Power Consumption: 1W
Memory Preservation: 20 Groups
Input voltage: DC 9V 1A
Product Size: 125x80x70MM
Output Signal: 3-48V
Net Weight: 410G
Time Mode: Welding Time: 1-999ms, Interval Time: 1-999ms
Frequency Output: Pulse Frequency: 1-20Hz, Pulse Duty Ratio: 1-99%


User Manual
Controller Compatibility:
This controller is compatible with most high-frequency arc ignition TIG welders.
Initial Setup:
1.Welder Settings
Set the welder’s original current to approximately 200A (or maximum).
Enable only the welding current and argon gas delay functions on the welder. Disable all other functions (if any).
2.Controller Settings
Adjust the controller’s welding time to 80.
Increase the welding time on the controller if the arc strength is insufficient; decrease it if the arc is too strong.
Operating Modes:
1.Controller Modes
Single-Point Mode: Activates welding with a single trigger press.
Continuous Mode: Maintains welding while the trigger is held.
2.Important Notes
Do not use the welder’s built-in argon welding mode after connecting the controller.
To revert to the welder’s original functions (e.g., for testing circuits or bypassing the controller), switch to TIG mode on the welder. This avoids frequent disconnection of the controller.
Troubleshooting & Diagnostics:
Issue ①: TIG Mode Works, Other Modes Fail to Ignite
Check 1: Verify controller parameters (e.g., welding time/current). Increase values if too low.
Check 2: Ensure all non-essential welder functions are disabled.
Issue ②: All Modes Fail to Ignite
Step 1: Listen for the controller’s operational sound (intermittent beeping when activated).
No sound: Proceed to Step 2.
Step 2: Verify Connection to Welder
Use a multimeter to test continuity between the controller’s 3-pin plug and welder’s 2-pin socket.
Insert the 2-pin plug into the welder. Short-circuit pins 1# and 2# of the 3-pin plug with a metal strip.
Welder activates: Connection is valid. Proceed to Step 3.
Welder inactive:
Solution: Adjust the 2-pin plug’s internal metal contacts using a pointed tool to ensure contact with the welder’s socket.
Step 3: Check Grounding
If a spark occurs but no arc forms (even in TIG mode), confirm the ground cable is properly connected.
Issue ③: No Response When Triggering
Check: Inspect the 2-pin trigger plug’s internal contacts.
Use a pointed tool to adjust the metal contacts in the plug’s socket for better connection to the controller.
Safety Reminder:
Always wear protective gear and ensure proper grounding before operation.